
Managing Job Results
Last updated: December 1, 2022
Overview
This page shows you how to manage all the generated output files from your jobs. Effective management of your output files has numerous benefits, including reduced file size (and therefore transfer speed), effective housekeeping of data, and easy access to files on Rescale Cloud Files.
When running a job on Rescale, the working directory is located at $HOME/work/. This is where the running software stores all its output files, as well as the working directory of the command line prompt that you are exposed to by default.
Once the job completes, the Rescale platform saves and transfers everything that is in the aforementioned work directory to Rescale filesRescale feature for data management with groupings of result... More. This is usually the last step in a job, and the time taken to do so is dependent on the total file size and number of files.
File name and file path limitations
File names, including file paths (e.g. ’/folder/sub-folder/example-file.txt), have a limit of 200 bytes, which is equivalent of 200 characters in ASCII encoding or 100 characters in Unicode encoding for languages such as Japanese or Korean. If a file’s path and name exceed this limit, this file cannot be saved and data loss might occur. Please ensure all job output files comply with this limit.
Best practice: Removing unwanted files
One way to effectively manage your files is to remove unwanted files at the end of your job. You can do this by adding additional commands below your simulationSimulation is experimentation, testing scenarios, and making... More command.
You can also use the wildcard * to match any character and delete multiple files in one command.
A sample command to include in your software settings page is shown below:

Caution: Deleted files cannot be recovered. Additionally, clean-up commands will not be run if the job hits its walltime.
Best practice: Use compressed files to speed up file transfer times
There are a number of benefits to compressing your files. First, it lowers the file size and number of files, therefore speeding up the upload and download process. This is particularly important when your output files are expected to be very large (>10GB).
Second, compressing your work directory into a single compressed folder helps preserve your directory structure. If you are managing your files on Rescale Cloud Files, we recommend storing zip files if you want to keep the directory structure.
Rescale supports the following compression types:
- .zip
- .tar, .tar.gz, .tgz, .gz
For example, if you want to archive all your d3plot files, you can use a command similar to:
tar -czf archive.tar.gz *d3plot*
rm *d3plot
Output file filters
The output file filters feature makes downloading a subset of your job result files easier by separately archiving files that match a filter. Filters on Rescale use regular expressions (regex) to match and return an output.
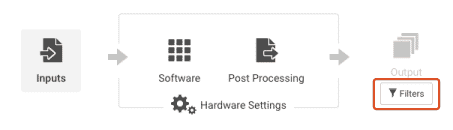
Setting up Selector(s)
You can access the Filters button from anywhere throughout the Job Setup as long as your job has not yet been submitted. Click the Filters button. An Output File Archive Filters window will appear as shown in the figure below:

Write your filter in the Selector box and click Add to apply the selector. The applied filter will be shown in the Selector(s) list. You can add as many file filters as you need. For multiple filters, it will take all matches and place them into a single archive.If you need to remove the selector, click the X key under the Action column. Below are several examples that can be useful for your case.
Example file filters everywhere for all directories:
**/**
This selector will zip all files in the results directories
**/velocity.jpeg
This selector will zip all files that are named exactly velocity.jpeg everywhere in the results directories
**/*.out
This selector will zip all files that end with a .out extension everywhere in the results directories
**/residual*
This selector will zip all files that begin with residual everywhere in the results directories
**/*plot*
This selector will zip all files that contain the string plot in the file name everywhere in the results directories
Example file filters for a specific directory:
**.jpeg
This selector will zip all files that end with .jpeg extension in the Results root (top level) directory
Airfoil/**
This selector will zip all files inside the Airfoil directory
Airfoil/*.out
This selector will zip all files inside the Airfoil directory that end with .out extension
Finding zipped Selector(s)
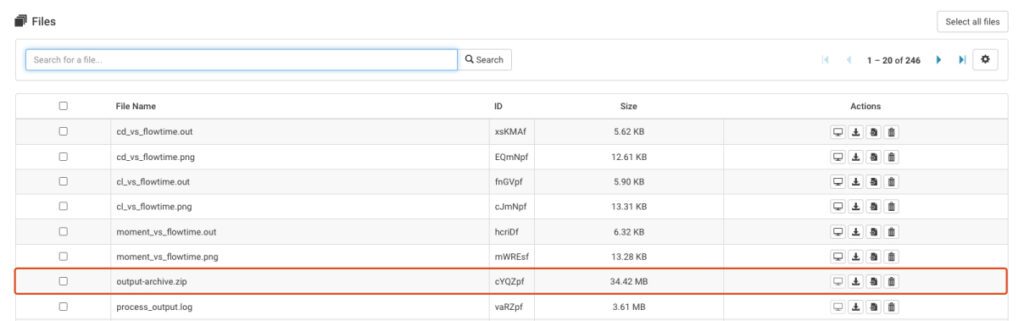
Once your job is completed, go to the Results page. All output file filters will be archived in a zip file and named output-archive.zip. This file can be found in the root (top level) directory of Results files as shown in the example image below.
Next steps
After managing your job results files, you can also use post-processing scripts to run more complex clean up and post-processing commands. This script will only be executed once all your commands on the Software Settings page have run. You can use this feature/script to clean up your job output or parse out variables for easy viewing on the Results page.
You can read more about using our post-processing feature here.