
SSH from Local Workstation
Updated: September 16, 2022
In order to connect to an active clusterA computing cluster consists of a set of loosely or tightly ... More using your own workstationA workstation is a powerful computer system designed for pro... More, you must configure an SSH key in your job settings prior to submitting your job. Instructions for setting up your SSH key and connecting to your cluster can be found in the sections below.
An SSH key is an access credential for the SSH (secure shell) network protocol. This authenticated and encrypted secure network protocol is used for remote communication between machines on an unsecured open network. SSH is used for remote file transfer, network management, and remote operating system access.
Note that the process for connecting from a Windows machine is different than that of a Linux/MacOS machine.
SSH from Windows Workstation Using PuTTY
You can use PuTTYgen to generate your public/private keypair. You can download PuTTY from here. The PuTTYgen utility also comes with the PuTTY client installation.
To generate an SSH key with PuTTYgen, follow these steps:
- Launch the PuTTYgen program.
- For Type of key to generate, select SSH-2 RSA under Key in the menu bar.
- Click Generate.
- Move your mouse in the area below the progress bar to provide randomness for the key generation algorithm. When the progress bar is full, PuTTYgen has generated your key pair.
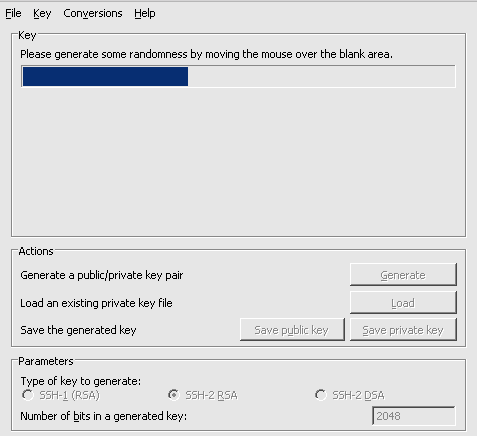
- Click the Save private key button to save the private key. Please save it in an accessible location.
We recommend that you use Pageant to save your SSH key for easy access and use within your command prompt.
- Right-click in the text field labeled Public key for pasting into OpenSSH authorized_keys file and choose Select All.
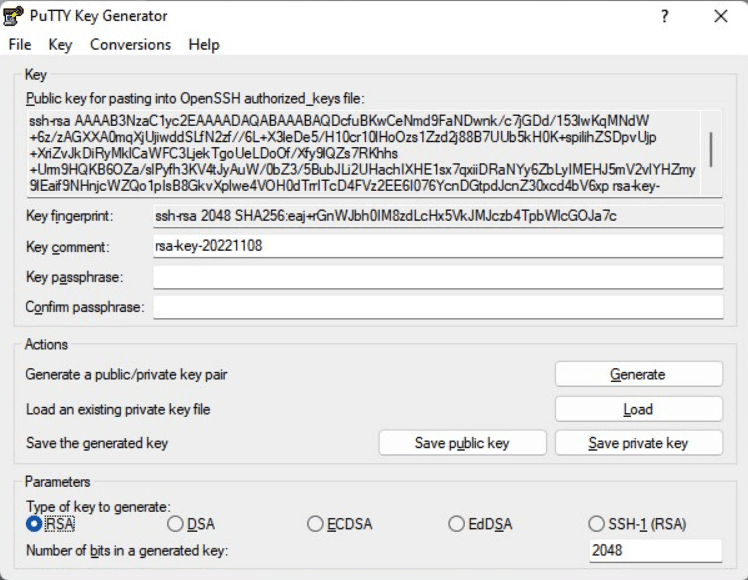
- Right-click again in the same text field and choose Copy.
- On your Rescale platform account page, click the <user>@rescale.com button at the top-right corner.
- Select Account in the drop-down menu.
- Click the Job Settings option (1) on the left side of the page.
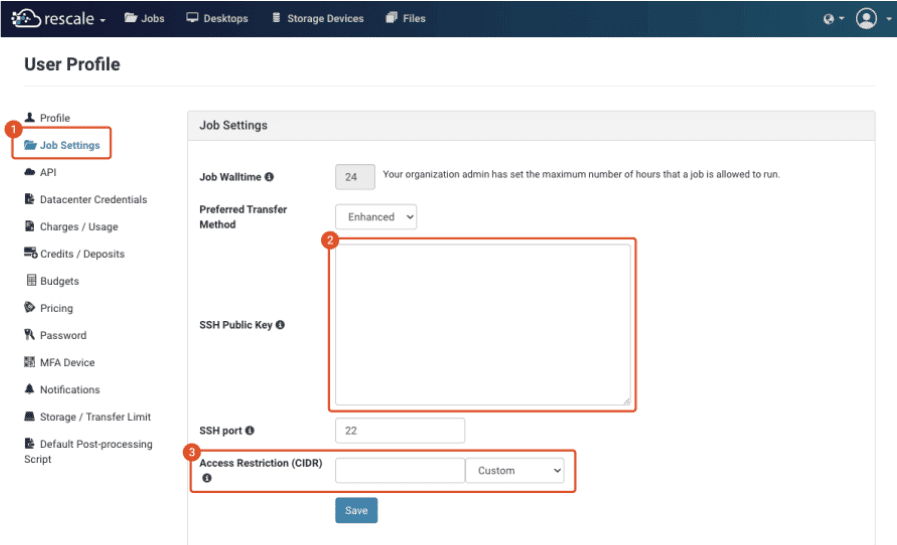
- Once you have copied the contents of your public key, paste the contents of the public key into the SSH Public Key field (2). Click Save and you will then be able to SSH into all your future clusters.
- The Access Restriction (CIDR range) field (3) allows you to select which IP addresses can access your cluster. The options Everywhere or My Current IP Address can be set automatically from the pull-down menu. You can also specify your own custom Classless Inter-Domain Routing (CIDR) rule by editing the Access Restriction (CIDR) range text field directly.
In Windows, you can use PuTTY as an SSH client to connect to your cluster on Rescale.
Once you have begun running the job you want to connect to, the Job Logs window on the Status tab will open after a few moments after the cluster is provisioned. This window will display a message showing the job’s username on the system and the public IP address of the head nodeIn traditional computing, a node is an object on a network. ... More of the cluster. The message will look like this:
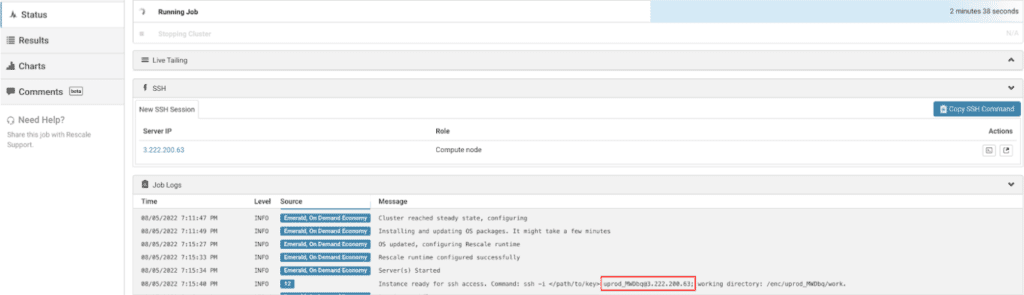
In this example, the job username is uprod_MWDbq@3.222.200.63 and the public IP address is 3.222.200.63. You will need this information when using PuTTY. To log in to your machine, follow these instructions:
- Launch the PuTTY program.
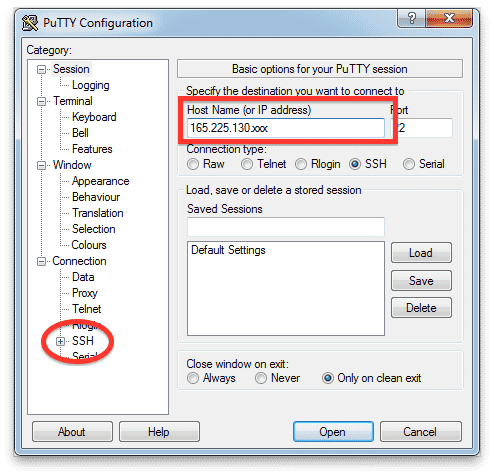
- Type the public IP address of your Rescale cluster in the Host Name (or IP address) field.
Note: The Port number is dependent on the hardware that is used in the job cluster. Check for the port number next to the job username and IP address and change the Port value accordingly. The number is usually either 32100 or 22.
- In the Category panel on the left, expand the SSH section to expose the authentication (Auth) settings.
- Click Auth to display settings controlling SSH authentication.
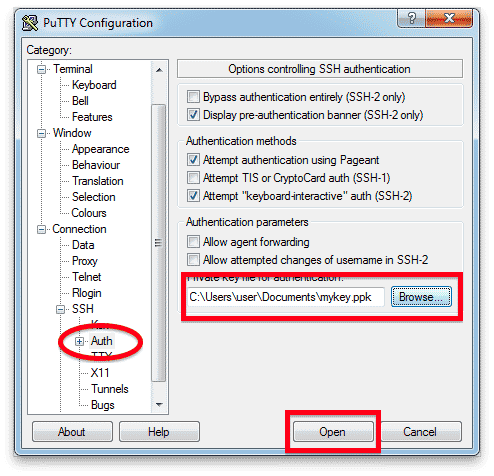
- Click Browse under Private key file for authentication and select the private key file you created previously.
Based on the type of connection to the cluster that you need for your workflow, you may need either a regular SSH session or an SSH tunnel connection:
For a regular SSH session
Click Open to start a PuTTY terminal session
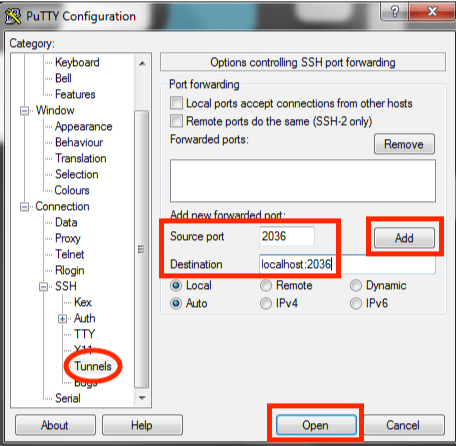
For an SSH tunnel connection
- Click Tunnels to display port forwarding settings.
- Type the Source port and Destination in the fields provided; this is specific to the servera server is a computer program that provides services to oth... More program and is provided to you:
- Source port: ####
- Destination: localhost:####
- Click Add to forward this port to your SSH tunnel configuration.
- Click Open to start a Putty terminal session.
When you connect to your cluster for the first time, you may see a PuTTY Security Alert warning you that the host’s key is not cached in the registry. Do not be alarmed; this is a normal warning. Click Yes to continue.
Follow these steps to log in:
At the login as: prompt, type the username, for instance uprod_qpWia and press Enter.
login as: uprod_qpWia Authenticating with public key "rsa-key-1234" Passphrase for key "rsa-key-1234":
You should now be logged into your machine
SSH from Local Linux/MacOS Workstation
On MacOS and Linux, you can run SSH key generation utilities from the command line of a terminal. To open the MacOS Terminal, open the Finder and choose Utilities from the Go menu. Find the Terminal application in the Utilities window and double-click it. The Terminal window opens with the command line prompt displaying the name of your machine and your username.
First, check for existing keys on your computer. From the command line of the terminal, type:
$ ls -al ~/.ssh
This lists the files in your .ssh directory; however, if you have a new MacOS or Linux installation, the .ssh directory may not yet exist.
The default public key file names are:
id_dsa.pubid_ecdsa.pubid_ed25519.pubid_rsa.pub
If you want to use an existing key for your Rescale account, you can skip to the following step: Copy contents of your public key
Generating a new SSH key
By default, keys for all identities are added to the directory:
/Users/_yourname_/.sshon MacOS/home/_yourname_/.sshon Linux
If you have an existing identity (public/private key pair) in this directory that you want to use on Rescale, skip this step. To create a new default identity:
- Open a terminal session on your local system.
- Enter
ssh-keygen -b 4096at the command line. - The command prompts you for a file to save the key in. If the
.sshdirectory doesn’t exist, the system creates one for you. - Accept the default location.
The ssh-keygen command creates your default identity with its public and private keys. The whole interaction will look like this:
[mairi@centos ~]$ ssh-keygen -b 4096Generating public/private rsa key pair.Enter file in which to save the key (/home/mairi/.ssh/id_rsa):Enter passphrase (empty for no passphrase):Enter same passphrase again:Your identification has been saved in /home/mairi/.ssh/id_rsa.Your public key has been saved in /home/mairi/.ssh/id_rsa.pub.The key fingerprint is:ed:88:95:91:38:e4:5e:ff:d6:73:70:f7:43:3e:f6:3b mairi@centosThe key's randomart image is:+--[ RSA 4096]----+| . || o . . || + + || . o = || . S o ..o|| o o . .ooo|| . . . o o=o|| . .E+|| .+|+-----------------+
You can save your new key pair to an alternative, i.e. non-default, location in your file system if you want. By default, ssh-keygen generates 2048-bit RSA keys, but Rescale recommends using 4096-bit keys for security reasons (the -b 4096 argument above).
ssh-keygen generates a public key and a private key. If not specified, the default public key will be saved as id_rsa.pub and the private key as id_rsa in your ~/.ssh folder. Ensure that the ~/.ssh is only accessible by you by setting the proper permissions to that folder:
chmod 600 ~/.ssh
On Linux, copy the contents of your chosen public key file by opening it in a text editor or by running the cat command (in this case the public key is stored in the id_rsa.pub file):
$ cat ~/.ssh/id_rsa.pub
On MacOS, you can use the command pbcopy in the terminal to copy the contents of your public key file to the clipboard as follows:
$ pbcopy < ~/.ssh/id_rsa.pub
- On your Rescale platform account page, click the <user>@rescale.com button at the top-right corner.
- Select Account in the drop-down menu.
- Click the Job Settings option (1) on the left side of the page.
- Once you have copied the contents of your public key, paste the contents of the public key into the SSH Public Key field (2). Click Save and you will then be able to SSH into all your future clusters.
- The Access Restriction (CIDR range) field (3) allows you to select which IP addresses can access your cluster. The options Everywhere or My Current IP Address can be set automatically from the pull-down menu. You can also specify your own custom Classless Inter-Domain Routing (CIDR) rule by editing the Access Restriction (CIDR) range text field directly.
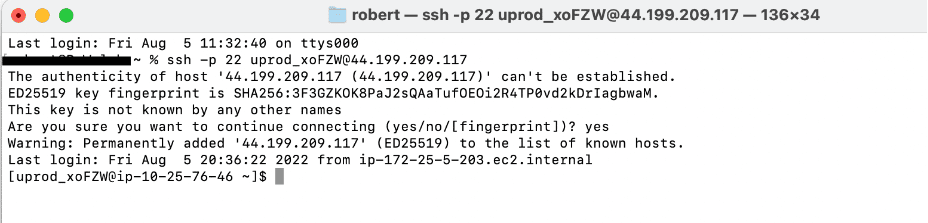
In MacOS and Linux, you can use the terminal to log into your machine.
The easiest way to do this is by using the Copy SSH Command button, shown below:

After pressing the button you can now open a new terminal in your Linux/MacOS machine and paste this command, it will log you into the cluster.
Another option to connect to the cluster is when you provision a cluster, the Job Logs section on the Status tab will display a message showing the job’s username on the system and the public IP address of the head node of the cluster. The message will look like this:
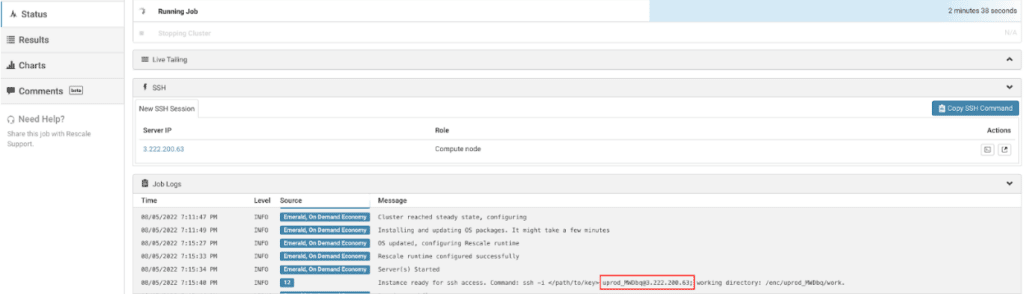
In this example, the job username is uprod_qpWia and the public IP address is 107.23.132.81. You will need this information to log in to the cluster.
- To log in to the cluster from a Terminal window, call
sshusing a command of the form:
$ ssh uprod_qpWia@107.23.132.81
- Here, <private key file> corresponds to the previously generated private key,
id_rsa(Notid_rsa.pub) - The
sshcommand will log you in to your machine as the job user. If you defined a passphrase for your SSH key, the operating system will prompt you for it.
The terminal prompt should now show that you have logged in as the job user, and you can explore the directory structure and files and run commands as desired. Note that all commands entered in the software command box when setting up your job are run from ~/work/shared, and that process_output.log will end up in ~/work.